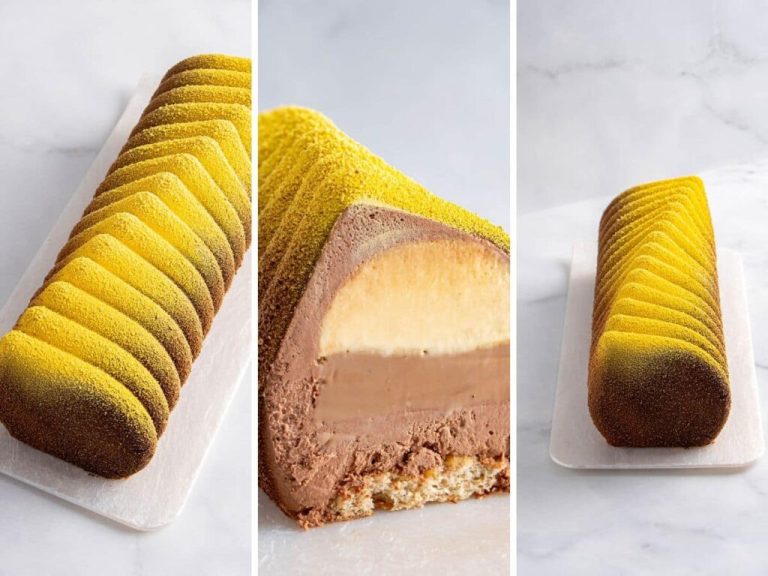
Pistachio Raspberry Entremet
Whenever I can get my hands on the brilliant Silikomart silicone molds I’m in heaven. Now, to be totally honest, buying baking equipment is addictive and not the cheapest hobby of them all. I’m really trying to hold back on it and only buy what I need, whenever I need it, making sure it’s something I can use later on for other desserts. But silicone molds like this one, known as Eclipse, are meant to last you a lifetime – not only because they are well made, but also because their shape is ever-lasting – it can be used for basically any cake you might think of, turning something otherwise common into a pastry masterpiece.

This pistachio raspberry entremet is something I dreamt of ever since I read about the award winning Ambroisie created by pastry chef Hidemi Sugino. In 1991, he won the World Pastry Cup with this desserts – that’s a pretty big deal in my book! He uses pistachio, raspberry and chocolate in such a delicious, incredible way that is totally inspiring. Just google it and be amazed by its simplicity and yet its complexity. It’s not a dessert that impresses with its design, but one that relies on its amazing taste to blow you away. Or at least that’s how I pictured Ambroisie – a mix of flavors, colors and textures that complement each other perfectly, creating a dessert to remember, a dessert that you can never get bored with. The mix of flavors is what caught my attention in the very first place and it’s this particular mix that allowed my imagination to go wild and picture it in all sorts of cakes, in all sorts of ratios.
Starting from this mix of flavors I created this pistachio raspberry entremet that has layers of fluffy pistachio Joconde sponge cake, white chocolate mousse, raspberry jelly, pistachio mousse and my reliable chocolate mirror glaze. It’s a cake that has a delicate flavor, but an intense richness. Both pistachio and white chocolate are silky and have these earthy, delicious notes, only to be cut through by the tangy, fragrant raspberry jelly and the intense chocolate glaze.

Pistachio Raspberry Entremet
Ingredients
Pistachio Joconde sponge:
- 20 g all-purpose white flour
- 70 g ground pistachio
- 70 g powdered sugar
- 2 whole eggs
- 2 egg whites
- 1 g salt
- 20 g white sugar
- 15 g butter (melted)
White Chocolate Mousse:
- 120 g white chocolate
- 100 g heavy cream
- 2 egg yolks
- 20 g white sugar
- 3 g gelatin + 15ml cold water
- 120 g heavy cream (whipped)
- 3 g vanilla extract
Raspberry Jelly:
- 150 g frozen raspberries
- 40 g white sugar
- 3 g gelatin + 15ml cold water
Pistachio Paste:
- 100 g pistachio (peeled)
- 65 g white sugar
- 35 g water
- 1 g salt
- 20 g almonds (ground)
- 2-4 teaspoons neutral vegetable oil (coconut)
Pistachio Mousse:
- 2 egg yolks
- 60 g white sugar
- 30 g water
- 50 g pistachio paste
- 2 g gelatin + 10ml cold water
- 100 g heavy cream (whipped)
Mirror Glaze:
- 225 g white sugar
- 75 g cocoa powder
- 135 g water
- 150 g heavy cream
- 7 g gelatin + 35ml cold water
- 0.5 g salt
Instructions
Pistachio Joconde:
- Combine the pistachio, powdered sugar and eggs in a bowl and mix with an electric mixer for a few minutes until pale and double in volume.
- In a different bowl, mix the eggs whites with a pinch of salt until fluffy.
- Stir in the sugar and mix well until glossy and stiff.
- Fold the meringue into the postachio mixture, alternating it with the flour.
- Drizzle in the melted butter then spread the batter in a 25x25cm pan – it needs to be about 1cm thickeness as it rises.
- Bake in the preheated oven at 350°F for 15-18 minutes or until golden brown.
- Allow to cool down in the pan.
White Chocolate Mousse:
- Place the chocolate in a bowl.
- Bloom the gelatin in cold water.
- Heat 100g cream in a saucepan.
- In the meantime, mix the egg yolks with sugar until creamy and pale. Pour in the hot cream then return over low heat and cook until it reaches 82°C.
- Remove from heat and add the vanilla then pour the mixture over the chocolate.
- Allow to rest for 5 minutes then mix well until smooth. Add the gelatin as well.
- Allow to cool to room temperature then fold in the whipped cream.
Raspberry Jelly:
- Combine the raspberries and sugar in a saucepan and allow to rest for 10-15 minutes – it starts to defrost and becomes juicy.
- Place over low heat and cook for 5-10 minutes until softened.
- Bloom the gelatin in cold water.
- Pass the raspberry through a fine sieve then stir in the melted gelatin.
- Pour the jelly into a small cake pan (16cmØ), making sure it would fit your Eclipse mold later on. Freeze for 4-5 hours, preferably over night.
Pistachio Paste:
- Combine the sugar and water in a saucepan.
- Place over low heat and cook until it reaches 116°C.
- Remove from heat and right away stir in the pistachio. Mix with a wooden spoon until the pistachios are covered in crystallised sugar.
- Transfer the pistachio in a food processor or blender.
- Add the rest of the ingredients then pulse for a few minutes until well mixed and smooth, adding more oil if needed.
Pistachio Mousse:
- Bloom the gelatin in cold water.
- Start by making a base for the mousse: combine the sugar and water in a saucepan and place over medium heat. In the meantime, mix the egg yolks until pale. Gradually pour in the hot sugar syrup, mixing well for a few minutes until stiff and pale.
- Add the pistachio paste and mix well then stir in the melted gelatin.
- Fold in the whipped cream.
Mirror Glaze:
- Bloom the gelatin in cold water.
- Combine the sugar, cocoa powder, water, cream and salt in a saucepan.
- Place over low to medium heat and cook until it becomes thickened.
- Remove from heat and stir in the gelatin.
- Allow to cool to room temperature before using.
To assemble the cake:
- Start molding the cake upside down:
- – the first layer is the pistachio mousse
- – the second layer is raspberry jelly
- – the third layer is white chocolate mousse
- – the final layer is the pistachio Joconde
- Once molded, place the cake in the freezer for at least 6 hours.
- Remove the cake from the mold and place it on a wire rack.
- Pour the chilled glaze over the cake and allow it to drip off for a few minutes.
- Transfer the cake over a platter and decorate as you wish.
- Enjoy!
Want to bake like a pro? Learn professional layered cakes step by step with our online courses and ebooks – from Red Velvet to Caramel Carrot Cake. Browse the courses →